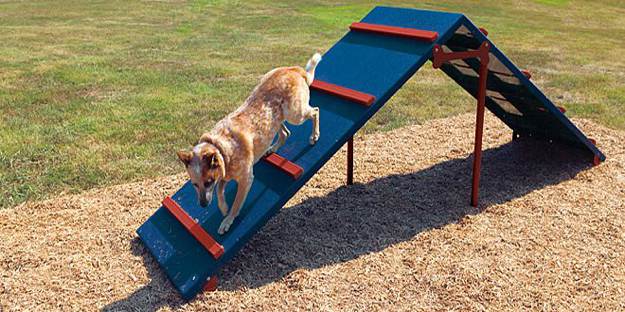
 Agility courses can be a great training and exercise tool for you and your pup! They can include a variety of equipment that increases your dog’s athletic ability and stamina, while strengthening the team communication between handler and canine. Basic equipment that you can find on agility courses are jumps, tunnels, a-frames, teeters, weave poles, and dog walks.
We use A-Frames in our play yard to work with the dogs that are in our care, so we’re going to dive into how to DIY this type of agility equipment for your own backyard!
Let’s start with WHY you should consider building an A-Frame ramp…
- Agility is good exercise for you and your dog.
- Agility helps strengthen the bond between you and your dog because he must trust in you.
- Agility your dog fulfill it’s natural instincts (ie. climb, run fast, squeeze through narrow spaces, etc).
- Agility is good mental stimulation for your dog (following commands and navigating equipment) and you (calling out and signaling commands for your dog at a fast pace).
- Agility helps establish better communication between you and your dog.
A few things you should consider when you begin working with your dog on the A-Frame…
- HEIGHT: Training should start with the A-Frame in a low position. It can be raised as dog becomes more comfortable, but your dog can seriously injure itself if it jumps off the peak of a high frame because it isn’t quite comfortable with the apparatus yet.
- COMMAND: Pick a word to signal the dog to seek out and climb the A-Frame (e.g. “Climb”, “Climb it”, “Up”, “Frame”).
- CONTROL: Handler should have good control of the dog on a short lead until dog knows how to climb and exit safely. Again, we don’t want Fido getting hurt, so make sure you are providing a strong sense of control in the situation – this will help you perceive when your dog is comfortable and will give your dog a sense of security.
- TREAT TRAINING: Use treats to lure / reward the dog for climbing up and down the A-Frame. It’s common to stop the dog at the very top of the frame and treat, then at the bottom contact.
- SUPERVISION: Dogs should NEVER be left to climb equipment unsupervised. Again, we don’t want any injuries to occur!
Now let’s turn to the DIY Network for a step-by-step guide on how to build your own dog an agility ramp:
Tools & Materials Needed:
- 4×8′ sheets of plywood
- table saw or circular saw
- 2x4s
- nail gun
- wooden rungs
- galvanized nails
- house paint
- sand
- eye rings
- chain
Instruction Steps:
- Build the A-frame climbing wall. Use a table saw or circular saw to cut two 4′ x 8′ sheets of plywood down to 3′ x 8′. To make the plywood pieces rigid, attach 2x4s around the perimeter and one lengthwise down the middle of each piece. Attach the 2x4s with a pneumatic nail gun through the face of the plywood.
- Add wooden rungs to the wall. Wooden rungs will aid your dog’s traction as he climbs the A-frame. Starting from the bottom, mark lines every 12 inches across the width of the plywood. Cut 1×4 lumber 35 inches long for each rung. Center each rung horizontally along your lines; you should have a 1/2″ reveal on each side of the rung. Attach the rungs with wood glue and 1-1/2″ galvanized nails.
- Paint the A-frame wall. Apply two coats of standard, exterior house paint. Mix the paint with sand to add traction to the walls. Having two different colors on each side of the A- frame is recommended so your dog can get a clear picture of the obstacle.
- Finish the A-frame wall. Use 3-inch hinges at the top and to attach the two sides of the A-frame. Attach eye-rings about midway down on each side of the wall (on the 2×4). Attach a chain through the eye-rings so you can adjust the height of the wall.